Using VLC for Screen Recording
After learning how to convert files with VLC in our guide, Mastering Audio and Video File Conversion with VLC Media Player, you might be interested in another powerful feature of this versatile tool: screen recording.
If you're looking to create tutorials, record gameplay, or capture online content, VLC is a versatile tool that can meet all your needs.
Here’s a comprehensive guide to help you maximize its screen recording capabilities.
Step 1: Open VLC Media Player
First, ensure you have the latest version of VLC installed and launch the application to get started.
Step 2: Access the Capture Device Menu and Configure Screen Capture
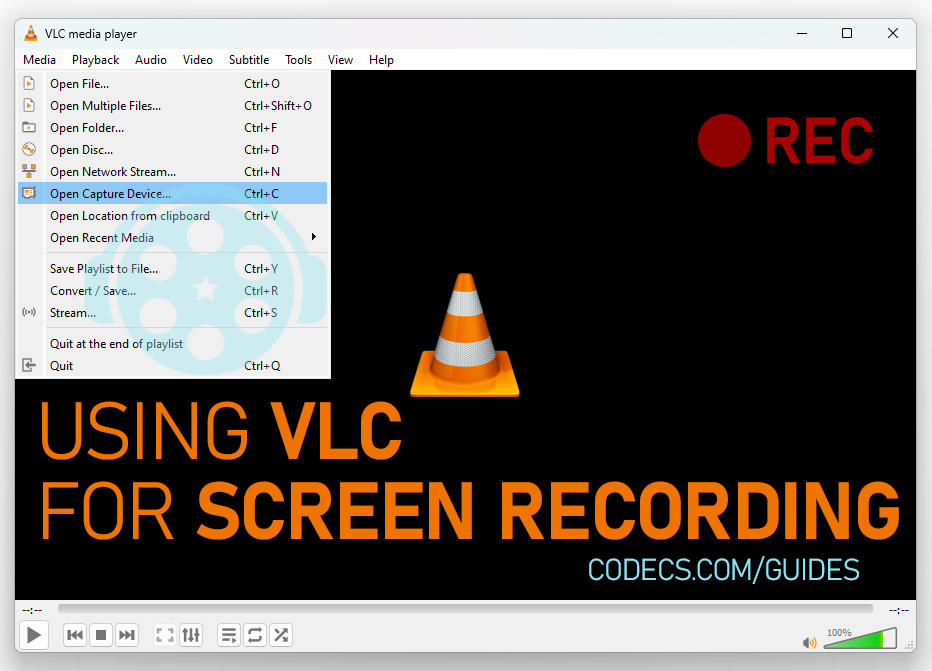
In the top menu, click on Media and from the dropdown, choose Open Capture Device... (or Ctrl+C).
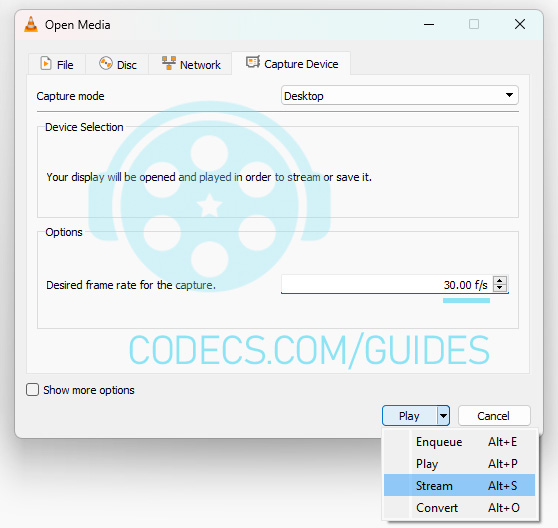
Capture Mode: In the Capture Device tab set the Capture mode to Desktop.
Frame Rate: It’s important to enter 30 f/s in the Options / Desired frame rate for the capture. field. This ensures a smooth recording experience and prevents issues with choppy or laggy playback. If the frame rate is too low, your recording may not capture movements accurately.
Step 3: Choose Output Format
Before you start recording, you need to specify where the recording will be saved:
Stream Output: Click on the arrow next to the Play button and select Stream (or Alt+S).
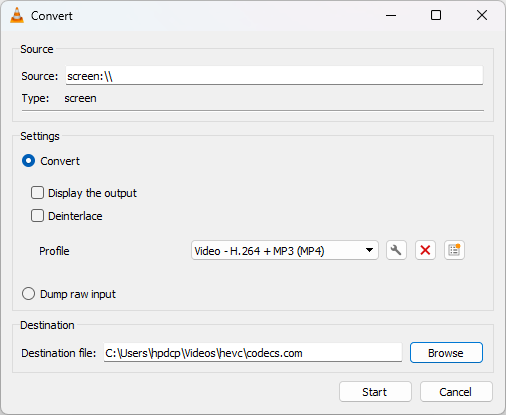
Output Destination: In the stream output window, select File and then click Add.
Choose Location: Browse to where you want to save the recording and name your file with the appropriate extension (e.g., .mp4).
Select Profile: Choose a suitable encoding profile, such as Video – H.264 + MP3 (MP4) for video recordings.
If you only want to record audio, select an audio profile like Vorbis (Ogg), MP3, or FLAC.
Step 4: Start and Stop Recording
Stream: After configuring the output, click Stream to open the next settings window.
Stream Output: Ensure your settings are correct, then click Next and Stream again.
Begin Recording: Now, your screen is being recorded! Switch to the activity you wish to capture.
To stop recording, simply return to VLC and click the Stop button on the playback controls. Your recorded file will be saved in the location you specified.
Step 5: Quickly Start a New Recording
To begin a new recording without repeating the full setup process, go to Media and select Convert/Save... (or Ctrl+R).
In the Capture Device tab, click on Convert/Save button, then use the Browse button next to the Destination file field to choose a new file location and a name for your new recording.
Click Start, and your new recording will begin. You can repeat this process indefinitely to create multiple recordings.
Tips for Best Results
Run a Test Recording: Always do a quick test to ensure the audio levels and video quality are set correctly before starting your main recording.
Minimize Distractions: Close unnecessary apps and mute notifications to keep your recording clean and focused.
Check Audio Settings: If you're capturing audio, ensure your system’s audio is properly configured to allow VLC to record it.
Be Patient: Your recorded file will only be saved after you stop recording and (sometimes) close VLC, so wait until you’ve exited the program to find the file in your chosen location.
VLC Media Player is a powerful yet underrated tool for screen recording. With just a few clicks, you can create high-quality recordings for various purposes. So, after exploring file conversion, fire up VLC and start recording today!


